Wednesday, November 28, 2012

a sad lonely little shoe

i was riding on a high from my super adorable baby "Bapron" (see last post for details.) and thought… wouldn't it be cute to make matching shoes! wrong.

well i made one shoe.


and i wasn't happy with it. i must say, it does look better in this photo than i think it does in real life. issue #1, the insides…


check out those rough edges! ok, so they aren't really rough. this is fleece anyway. but the edges are raw inside. i did use my pinking shears. maybe i could've attempted a french seam inside or a flat fell. but this thing is tiny and not so easy to manipulate on a sewing machine. 

issue #2 is that the elastic around the top pulled on the front of the shoe too much. before i took the photos i cut the elastic (mainly because i was irritated with it) but you can still see a shadow in the photo on the side of the shoe where it causes pulling. maybe that's unavoidable.

or maybe i'm being too picky. this is just a baby shoe. but it is a gift. and i want it to be awesome. and it has to live up to the super cute "Bapron" because they would be a matching set.

i guess if the baby is wearing socks, then the raw insides wouldn't matter as much. i just think i would've done it differently - sew the outsides, sew the insides and then insert the insides as a lining and then probably do some hand sewing to attach them. I added the bias tape to the front piece to match the "Bapron" - that wasn't on the pattern. This was a free pattern though. and i'm sure someone spent a lot of time coming up with it and i've seen a lot of photos that look very successful.

but not mine. so i have a sad lonely right shoe.


and i was even more irritated because of the time i spent tracing, cutting, ironing, interfacing the parts… and now i don't even want to make the other shoe.

i have been scheming in my head about making my own baby shoe pattern. i could totally do it and i have an idea for a cute little bootie (with no raw insides!) but it would be helpful to have an actual baby to test the fit. so… until i politely ask a friend if i can borrow their baby's foot…

what could i do to lift my spirits after a failed baby shoe? (besides eating half a carton of moose tracks and watching an hour of house hunters on tv)

make another "Bapron" of course!!

front
this time a la Lilly Pulitzer! very charleston indeed! ok, this is not actual Lilly fabric. but it's hot pink and lime green, so come on! and my friend is having a girl, so why not?

back

i was thinking maybe it needs something extra. because hot pink and lime green floral aren't girly enough, right? ha ha. maybe a little bow?

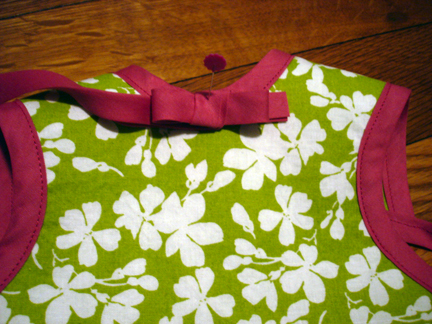


that was just a quick mock-up. i haven't actually added it yet. what do you think? to bow or not to bow?   


and i just found 2 free patterns to make baby diaper covers! i could make matching ones! or should i just quit while i'm ahead? they might end up like the sad little shoe? hmmm.

maybe it's time to get started on the christmas gifts… but baby stuff is just so dang cute (when it turns out well).

Tuesday, November 27, 2012

totally drool worthy

if you invite me to a baby shower now, you will be sure to receive at least one "Bapron." 

a friend of mine is expecting and i wanted to make something cute. so i came across the pattern at Craftiness is not Optional for a baby bib/apron: a "bapron." i set out to find some cute fabric and came across this super soft dotted fleece. originally i was thinking a small stripe, but i think the dots on the tutorial sunk into my subconscious and i ended up buying dots!

front

back


i love love love this pattern. and on my rating scale that's the most "loves" you get. that's like 5 stars. 

a couple notes… i decided to just use store bought bias tape to save time, but… if you pick a light colored bias tape and your fabric is darker… and you're a bit OCD, then you might run into a little issue. the way they fold bias tape in (i used extra wide double fold) the two folded sides do not meet up exactly in the center. there's a tiny gap. which is perfectly good in some cases, but in this case that means i could kinda see through that part of the bias tape and the darker fabric showed through. i didn't like it. i wanted a nice solid yellow (this is "lemon ice") all the way around the edges. so i went back to the iron and ironed the folded edges in just a touch more so that they met up exactly in the middle and there was no show through. kind of annoying. but much happier in the end.

more on ironing and bias tape…it helped a ton to realize the shape of the curve you will be putting your bias tape around, concave or convex. (if you have trouble remembering which is which, concave curves inward like a cave.) so the armholes and neckline are concave. the bottom edge is convex. iron your bias tape for each of these areas into the curved shape (concave or convex) that matches the area the bias tape will be applied too. i read this somewhere. and i'm glad i somehow remembered it at a time when it was very helpful!

also i didn't have any fray check, so i just stitched back and forth on the end of the tie before knotting it. i used the same fabric for the front and the back, but you could use different fabrics. it's pretty much reversible, both sides are finished. in between the 2 layers of fabric, i used some medium weight interfacing. it's such a great pattern. very smart. i love how the bias tape overlaps to leave everything looking very finished. my husband said "you could buy that in a store." which is a huge compliment.

oh one more thing, go very slow on the parts where you're going over 2 pieces of bias tape on the corners. i just used the hand crank on the side on those parts. it's a lot of layers to go through. but just do it slowly and you'll be golden. i also figured out a trick for lining up the bias tape with my machine's foot so that i got a nice even line of stitching close to the edge. it might be "duh" to most of you. but if anyone is curious or doesn't know how to get an nice even line of stitching close to the edge i can take a photo of how i lined it up. I did get a close up shot, so you can admire the nice lines of stitching.


are you drooling over this pattern yet?  well, pretty soon a baby will be drooling all over it. literally. oh and did i mention it's a free pattern? should i have started the post with that info? check it out: Craftiness is not Optional


and if you're not into baby stuff, i'll get back to doing my usual selfish sewing soon. ok a few more baby posts. and then some christmas gifts. and then back to myself. and no, i have not fixed the neckline of my knit top yet. i haven't even ripped it out yet. it's just hanging there glaring at me while i sew cute little baby things.


Monday, November 19, 2012

argggggh! a wasted weekend of sewing

oh no! i let over a week go by with no post! the horror! i really wish i had the time to post daily. i was shooting for at least weekly, but alas… it's such a busy time of year! and i need to get a new computer. Luckily we got our christmas bonus last week, yay! we don't always get one but things are looking up. so i want to get a macbook pro. a very merry christmas to myself indeed! i must be the biggest apple snob that does not have an iphone! ha ha, my cell phone is a samsung and it was free. sometimes i am very frugal. but i do have 2 ipods. well both were gifts. the thing is, my imac needs to be retired. actually i just need to have a funeral for it. it's so out of date. it's a g3! shock and horror! actually if i wait a little longer i might be able to sell it as "hip and retro." so for right now i can still blame my super slow computer for lack of blog updates. i'll have to come up with a new excuse once i get the new computer. 

anyway, i know i promised not to take any more photos from my bathroom mirror, but… 


i apologize. for your benefit, you don't have to look at my camera, because look - i'm eating a cartoon cheeseburger! yum!

that's my most recent alma top, which i wore, um, a week and a half ago. i got one compliment! and of course i said ' i MADE it!" yeahhh. and she said it looked expensive. i'm blushing.

oh and i got lazy and never made the belt. i wanted to move on. so i did. i traced a t-shirt i had from old navy that fits pretty well and used the pattern to cut up the dress i started to make over the summer. it was pretty smooth sailing until the neckline. let me just say that all of the sewing i did this weekend was wasted. i will have to rip it all out. sad face.


take a closer look at that neckline…


yeah, you can see by that shadow that it's drooping forward. i did not stretch the bias tape enough as i was putting it into the neckline. i was trying to think of ways to save it, but i think i'm going to have to take the seam ripper to it. and at the moment i am not a fan of bias tape. i might just make a facing instead. what do you think? how would you save this?

and here's a photo of me wearing it. and enjoying a lemonade!


yeah i could've photoshopped out the wrist strap, but i thought it was funnier if i just left it in.

anyway, how do you like to handle the necklines and hems of knits? and i can't leave it raw, i'm too OCD. right now i really want to just get back to some woven fabric!! stupid knits.


Wednesday, November 7, 2012

alma almost done

Thank you for all of the input on my button choice! I ended up going with…


the button that was 2nd from the left! The next runner up was the small white button on the far right. What do you think? Does it look ok? I was still thinking maybe it's a little big, but i liked the metal look. Anyway there's no going back now. plus i didn't want to go to the store looking for another button. 

I think it looks pretty good, but then my husband pointed out, "why are there only buttons on the cuffs and not on the front of the shirt?"  

"um, because that's how the pattern was."

well and this was my first attempt at buttons, so start small, right? he also stands by the notion that soon i won't need patterns. after all, they don't use patterns on project runway. 

hehehe. i think i still need to start from a pattern, geez i only started really sewing this year. i'm not about to just start draping and pinning and cutting with no plan, and my dress form (that i still have not gotten rid of - laziness on my part) is not my size at all.

anyway. check out my french seams…


oh la la! magnifique! (i don't know any french) i took some photos on sunday before i finished the hem on the bottm, so you can see that edge is still raw. but i've since finished the hem. i actually went outside to try taking photos! aren't you proud! in this one it looks like the shirt is floating.


the hanger was clear. but it looks kinda creepy? ghost shirt? a little late for halloween. here's one hanging on the gate next to our garage.


do you have any good spots to take photos? i'm having a hard time finding good spots nearby - where no one can see what i'm doing. the neighbors don't need to see me taking a million photos of a shirt. 

tonight i might try to whip up the belt and wear the shirt tomorrow! i think it might need the belt? yes ? no?

and then it's on to the next project!!! so i was thinking of seeing if the knit fabric i cut to make a dress back in July can be salvaged into making a 3/4 sleeve tee. here's the post about it. i never finished it because the top was too big and there was a lot of swayback fabric pooling. and now i don't want a sleeveless knit dress. i was thinking about tracing the  shape of a shirt that fits well and seeing if i can recreate it. as long as i have enough of this fabric. i hate having WIPs laying around and i'd like to salvage the fabric…

i also want to take a time out and start making a few christmas presents for a couple girl friends. clutch purses maybe? or makeup bags? I just checked out 5 books from the library that have handbag projects. (one of the books was published in 2012 and includes pull out patterns - our library is awesome!) i also like the simple party clutch on Sew, Mama, Sew! does it need the strap? what do you think? do you have a favorite pattern for a small purse or clutch??


Wednesday, October 31, 2012

Buttons! but no halloween sewing

so i haven't made much progress on the sewing front. this weekend i got zero sewing done because i went camping in the mountains of NC with 5 of my girlfriends. not my idea. i am not outdoorsy at all. but it was to celebrate my friend's 29th birthday and camping is what she wanted to do. i do like smores though. and i don't mind hiking. just sleeping on rocks isn't my thing. i should've had more padding. anyway we were right on the river. beautiful.


we got zero rain while camping, which is good. waking up on a rock is one thing. waking up in a puddle is something else. (we did have a very large tent, in case you were worried.) i hear it rained a lot at home. i hope the rest of you along the east coast weathered the hurricane.

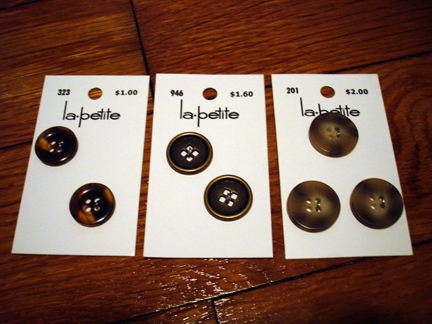
before leaving town on sunday, we stopped in a little antique shop. it wasn't a cheap antique shop, so i had to pass up the cute thread holder that hangs on the wall - too pricey. but i did grab some buttons! which is great because i'm almost to the point where i need to put buttons on my long sleeved alma blouse. yes, i am still working on it. i am soo slowwww. so here are the buttons i picked up:


These are my favorites… 2 with a pearly jade color


and these bunch kinda look like abalone shell with that iridescent quality on the front and then a rough back, but i'm not sure


A week or so ago i grabbed these next 3 button sets from hancock during one of their sales. but i didn't have my fabric with me at the time - always bring your fabric when trying to pick out buttons! now i'm thinking they all might be a little too big for a shirt cuff? 


It also tickled me that the names of the button brands all sound fancy and french. here we have "la petite" (although i think these are too large, ha ha!) and from the antique store we had "la mode" and "le chic." 

i already have a mini stash of random buttons that i've been saving since forever. i always keep the extra buttons that come with store bought items. i promise i'm not a hoarder. but most of these are single buttons and i need a matching pair. one even came with extra matching thread (see the yellow button). the clothing companies must know that their items are not well constructed and that customers should anticipate that the buttons will fall off


so here we have my cuff with several buttons on it. there is one that i prefer. but i'm still thinking that maybe these are not the right size? what do you think? do you like any of these buttons or what would you use?


now i'm going to make another excuse for why this project is taking me so long: the continuous sleeve placket.


i thought it was going to be the death of me. i just could not get it. the corner would get bunched up. finally i read this tutorial and it showed that the seam allowance can taper down closer to the point instead of being the same width. (if that makes sense) it helped me a lot. finally i got it worked out, yippee! that took forever.


but doesn't it look nice! now i hope these sleeves end up being long enough after i attach the cuffs and then attach the sleeves to the bodice. if not, i guess i'm re-cutting longer cuffs. oh and i didn't mention i finally made my first practice buttonholes! my machine has a buttonhole foot and it does them in one step like magic. it's pretty amazing. i was proud of how nice they looked and i barely did anything.

happy halloween everyone! I haven't really dressed up since college, so i don't have a costume. our city does have some crazy halloween parties, but i'm going to sit at home and pass out candy to little kiddies. i love seeing the little costumes. and then later tonight my neighbors are having a bonfire - yay, more smores!

did you do halloween sewing? and any thoughts on button choice for my long sleeved alma? help, help!


P.S. There's an awesome giveaway going on over at megan nielsen's blog - check it out!


Monday, October 22, 2012

thank you, lovely readers!


I got this sweet little blog award from the lovely zosews. i'm fairly new to the whole blogging scene, so i don't have a ton of awards under my belt (okay none). actually i wasn't really even aware there were blog awards until recently. 

UPDATE: the lovely juliet of The Crazy Gypsy Chronicles also just included me for this award on her blog! 

This blog award is "a way to say a big thank you to the people who encourage you by commenting on your blog." Pass along to the last nine commenters on your blog.


i really appreciate everyone who reads my blog posts. each comment makes me say "oh YAY!"

so my last nine fabulous commenters are:

2 Sabs
6 elltie (i can't find your actual blog - let me know!)

thank you, thank you! keep spreading the love!


Thursday, October 18, 2012

alma one and done

if you remember back to when i posted about my first alma blouse… i thought it was finished but then it just wasn't wearable - this post from september. i had 3 options to try to make this top wearable:

A. go buy a skinny black belt that looks good with it (i tried the 2 black belts i own, no bueno). 
B. make the belt that's included in the pattern and hope for the best.
C. rip out the side seam, insert a zip, and then pinch the heck out of the back darts to remove excess fabric.

so what did i do? (and by the way thank you for all of the input, you guys are so smart!)

I did C, and then I also did B! 

I ripped out the side seam and inserted a zip. ugh. inserting it after the fact was more annoying than if i had just left it in in the first place. but it worked for the most part. not perfect, there's a little gaping toward the bottom where you can see the zipper, so it's not 100% invisible, but close. 


then i ripped out the 2 back darts and increased the width of the darts significantly. much better.

but still not quite right. so i had more fabric and i decided to whip up the belt and see if i liked it. 

i tried it on beltless and with the belt (which i topstiched all the way around even though that's not called for in the instructions) and the conclusion was… i ended up wearing it with the belt! i think it helped break up the pattern and define the waist better. and this fabric is just not drapey at all.


so i actually wore it to work! and one person (who knows that i've started sewing) asked if i made it. hopefully i will wear it again. it's not terrible. but not something i love love love.


these photos offer you another glimpse into my tiny bathroom. how exciting!


and you can check out my husband's blue toothbrush and my bottle of eyedrops that are making cameos in the bottom of this photo. Yes, i do know how to crop in photoshop. i can also clone and clipping path. and all kinds of crazy stuff. but i'm keeping it real. all i bothered to do was auto levels because the lighting was terrible.

ok, next batch of photos i will really try to take outside in daylight with my tripod and the self timer. i really promise. (confession: i actually don't really like taking photos of myself at all! and i blink all. the. time.)


so there you have it - alma number one, done. it feels so good to be actually done. and i'm so delayed in posting this that i'm well into alma the sequel! 

anyone else super slow to finish a project or do you finish something every other day? if i get one project finished each month, i'm doing well. =)